
IPv4 Subnetting Explained, How to Design Your Home Lab
Are you a server admin wondering how to IP Address Your Lab or production environment? If so, in this article about IPv4 Subnetting Explained, I will give you the best advice on how to setup your network IP scheme in your lab.
Our lab should resemble real life so this design will look and work like a real corporate network.
Here is a little downloadable PDF cheat sheet to understand IP addresses (Subnets and Supernets) better. Please download it as it will be very useful in your lab and in your DevOps career. I am always adding new commands to my cheat sheets so visit often to get the latest copy.
First things first, lets understand the difference between IPv4, IPv6, Public IP, Private IP, and Reserve IP addresses? This will get us started on the right foot.
IPv4
IPv4 uses 32 binary bits to create a single unique address on the network. An IPv4 address is expressed by four numbers separated by dots. Each number is the decimal representation for an eight-digit binary number, also called an octet. For example: 216.27.61.137.
IPv4 has existed since the early 1970’s and its growth potential is very limited in the modern age. Under IPv4, there are 232 possible combinations, which offers just under 4.3 billion unique addresses.
IPv6
IPv6 uses 128 binary bits to create a single unique address on the network. An IPv6 address is expressed by eight groups of hexadecimal (base-16) numbers separated by colons, as in 2001:cdba:0000:0000:0000:0000:3257:9652. Groups of numbers that contain all zeros are often omitted to save space, leaving a colon separator to mark the gap (as in 2001:cdba::3257:9652).
IPv6 increased the ip addresses to (340,282,366,920,938,463,463,374,607,431,768,211,456). As you can see, there is many times larger than the original 4 Billion.
Switching to IPv6 is hard and complicated for larger companies so they are in no rush to go there. They are the lucky ones who probably have a large block of IPv4 public addresses but the rest of us may not be so lucky.
Public IP Addresses
Public addresses (or Routable) are addresses that can leave your local network and go out into the real world and talk to other computers outside your network. These are available from your ISP or if you are a large company and already have an address space, your IP or DNS administrator.
Public addresses are limited since most companies have not made the switch to IPv6 yet. The use of private IP space has reduced the pressure of migrating to IPv6.
Private IP addresses
Private IP space is basically non-routable in the outside world. It can be used inside your company and when traffic needs to communicate with another company, we NAT (Network Address Translation) the address to a public one to allow for communication with another company.
The Internet Assigned Numbers Authority (IANA) reserves the following IP address blocks for use as private IP addresses:
- 10.0.0.0 to 10.255.255.255 (16 Million Addresses)
- 172.16.0.0 to 172.31.255.255 (1 Million Addresses)
- 192.168.0.0 to 192.168.255.255 (65K Addresses)
We will be using private IP space for our lab as most companies are probably using this space.
Reserved IP addresses
Reserved IP addresses are things like local loopback and broadcast addresses. Network addresses can also be considered reserved since they cannot be assigned to any device.
- Loopback: 127.0.0.1
- Network Address: The network address is the lowest address in a subnet. Often this could be 0 but not always.
- Broadcast Address: The broadcast address is always the highest address in a subnet. Often this is 255 but not always.
Subnetting
Subnetting simply takes one larger network, shifts the bits around, and creates several smaller ones to help you control your broadcast domains better. A broadcast domain is a local network not separated by a router so anytime a computer needs to find another, they will send out a broadcast to find it.
This is not an article on how to subnet addresses as I find watching a YouTube video much better at learning this then reading about it. Here is one I find helpful if you need to better understand subnetting.
IPv4 Subnetting Explained
IP Design in our Lab
Since we want our lab to resemble a real company, we will break our IP ranges and assign them into Cities all over the world. The key is to assign things into logical subnet points so they can be combined or divided easy in the future. The simple rule is to make sure your network number is divisible by 2, 4, 8, 16, 32, 64, 128, or 256.
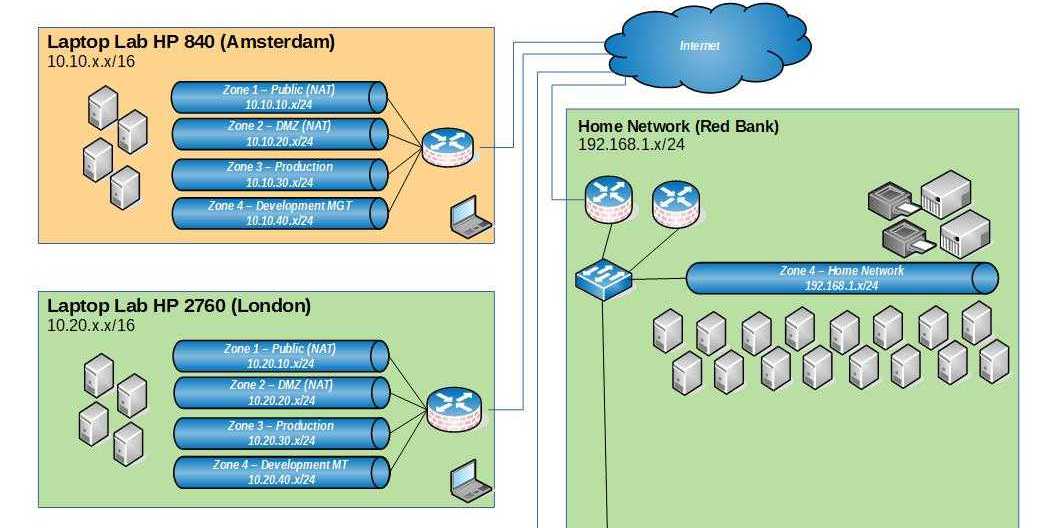
The reason for this is simple. We need to be able to group our networks into larger (super-nets) or smaller (subnets). In my lab, I wanted each network to be a /24 space to make things simple. Each lab (City) will have 5 Zones with a class C address for each network and this would all sit in the 10.x.x.x space.
For my WAN, I will use the 172.16.x.x space to cleanly divide my LAN and WAN traffic. This will make sniffing the network easy to spot different traffic patterns. My Home (family) network will use the 192.168.x.x space because I don’t want to interfere with the kids YouTube watching.
In my lab, I used the low end of the 10 address space but in real life, I would not recommend doing that. I would start at about 10.128.128.0. In my lab, I want to cleanly divide things and make it easily readable.
Here is My Design
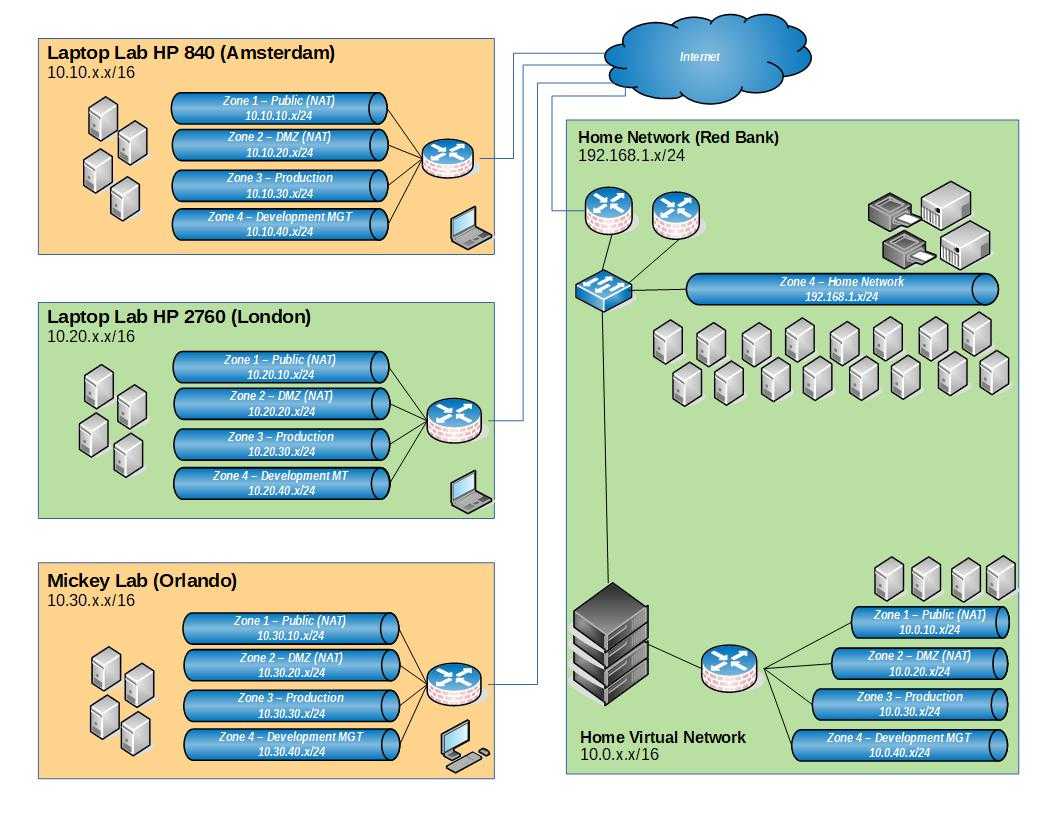
As you can see, I have 4 labs (2 laptop labs, one PC lab, and one larger house lab. The laptop labs allow be to develop scripts and test configurations on isolated servers very easily. The home lab allows me to build very complicated NSX and vRA designs. The WAN allows me to connect the whole thing together so I can work on anything in any lab no matter where I am at the time.
Each Lab (City) is using a 10.[0,10,20,30].0.x IP space and my WAN is using smaller subnetted 172.16.[0,1,2,3,4,5] all going through my home as a hub. Since I have no need to route to another smaller network, 99% of all traffic will go to and from the home network. This should be very close to real life company traffic where all communications tend to be from remote office to the home office.
I can easily subnet the WAN traffic since I will only be using 2 addresses and keep everything in one 172.16.0.0 /27 or /28 which is pretty common in production environments (actually /29 or /30 are more common but I don’t think this need sot be this small). If you are designing a real company, be sure to stick to around /28 for WAN interfaces.
For my NSX, vCD, or any environment where I will contain isolated IP space, I will use 192.168.10+.0/24 address space. I can always NAT this space with my lab IP space to interconnect everything.
Conclusion
That’s it for IPv4 subnetting explained and all pretty simple. I highly recommend using both the cheat sheet IP PDF above as well as using a online subnet calculator. Below are a few I use regularly.
http://subnet-calculator.org/
https://wintelguy.com/index.pl (great tool for way more then IP subnetting)
If you have any questions about IPv4 Subnetting Explained, please leave it in the comment section and I will try and help you out. Also please consider signing up for our email list to receive noticed when I upload new articles.