
Free Windows Hypervisor Lab on your Laptop

Ever want to get more hands on experience with new technology but couldn’t afford the costs of an expensive home lab. Here’s what I did to build a Windows Hypervisor Lab on your Laptop for free! I can now can build out very complicated DevOps configurations all within my virtual laptop space.
I a recent post, I compared using different virtual hypervisors to accomplish this task. In this article, I will dig into the details of how to do it.
If you work as a system or DevOps Engineer, your job required you to learn and have hands on experience with a lot of different systems. The best way to get that experience is to work with it first hand.
Classroom time is great but it doesn’t provide enough hands on experience that a personal lab could provide. Also, classroom time is a once and done event and soon forgotten. A personal lab is constant training and required in today’s job market.
[pt_view id=”ae1aed1g3p”]
Installing Windows Hypervisor on Win-10 Pro
Good news, Hyper-V now is part of the Windows 10 Professional installation.
The first step is to make sure you have enough power to run a home lab. I recommend at least an i5 CPU, 16 GB of RAM, and as big of a SSD hard drive as you can afford. Good news is these are available all over Amazon and for less then $200.
I create a directory off the root drive called “VirtualMachines”. Inside that directory I will store all my VM’s. Also, I created a directory called ISO where I put all my images to build additional VM’s.
Here is my review of the HP Elitebook 840 which I am using for my Hyper-V Laptop Lab.
Check Requirements
• Windows 10 Enterprise, Pro, or Education
• 64-bit Processor with Second Level Address Translation (SLAT).
• CPU support for VM Monitor Mode Extension (VT-c on Intel CPU’s).
• Minimum of 4 GB memory.
The Hyper-V role cannot be installed on Windows 10 Home.
You can install Hyper-V in several ways. You can use PowerShell or the through the Features GUI. Before doing either, make sure you turn on Hypervisor support in your BIOS.
Enable Hyper-V using PowerShell
- Open a PowerShell console as Administrator.
- Run the following command:
Enable-WindowsOptionalFeature -Online -FeatureName Microsoft-Hyper-V -All
If the command couldn’t be found, make sure you’re running PowerShell as Administrator.
When the installation has completed, reboot.
Enable the Hyper-V role through Settings
- Right click on the Windows button and select ‘Apps and Features’.
- Select Turn Windows Features on or off.
- Select Hyper-V and click OK.
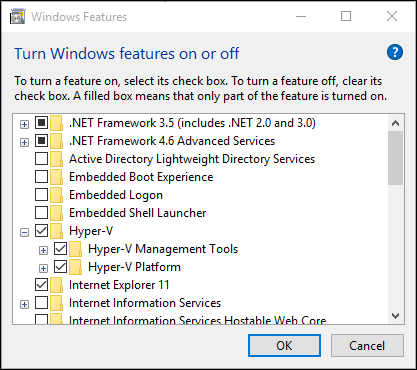
When the installation has completed you are prompted to restart your computer.
Designing the Network Layout
Having a properly designed network will make all the difference in how your lab will work. The core of any network is always the router or Firewall.
The standard network layout is to use Zones in your configuration. A network zone is just predefining what devices will go into that zone and most importantly, how you will secure and control communications in and out of that zone.
There are a lot of different ways to do this and you will find different people use zones slightly differently.
In order to build your virtual network, you need to create at least 4 virtual switches (vSwitches) to accommodate each zone. You will also need to define an IP space for each. Here’s how I did mine.
Security Zones
0-Zone: DHCP. WAN or External Interface
1-Zone: 10.10.10.0/24, DHCP 10.10.10.50-99, (NAT, Internet)
2-Zone: 10.10.20.0/24, DHCP 10.10.20.50-99, (NAT, DMZ)
3-Zone: 10.10.30.0/24, DHCP 10.10.30.50-99, (Prod)
4-Zone: 10.10.40.0/24, DHCP 10.10.40.50-99, (DEV)
At the core of your vSwitches will be a router. I am using Vyatta (VyOS) as a VM/Router/FW that is attached to each vSwitch. This way I can manage the traffic between all zones, provide DNS/FW/DHCP/NAT services to each zone, and support the VM’s networking needs.
Since this is a laptop, the external interface will change a lot but the inside should be more stable. I configured the GW to be .1 for each network and Google DNS (8.8.8.8) for my DHCP DNS server.
I configured Zone 1 and 2 to use NAT to Zone 0 meaning each zone will be able to get to the outside but nothing will come into those zones. Additional FW rules will make sure of it.
I will create a separate article on how to exactly configure the VyOS router and I will link it below. I will also create a post on how to create a nested ESXi server too and link it below as well.
Building Your First VM
Building my first VM, (not counting the VyOS router), I used Ubuntu 18. It was simple to install. If you have any trouble, MS has a article on how to do it here.
The way I build VM’s is I configure them to use DHCP during the install process and I name the server according to the static IP address I will give it later. For example, I called my first server a VM name of 188-Ubuntu18 and a DNS name of Server188. I then give the server a static IP address pf 188.
This allows me to SSH into the server easily and I can quickly keep things in order. The DNS name can be static in DNS so next week I can make it a Windows or RedHat machine and never need to change DNS.
Communication is very easy. When you create a vSwitch, windows will add a virtual interface on your laptop and the DHCP server will assign you an IP address. This is really a problem. The DHCP server will also give you another default gateway and your laptop will get confused on what to do with 2 Gateways.
The easy way to solve this is to give the virtual interface a static IP address without a default GW. On my computer, I gave the laptop .100 for each interfaces. Now I can SSH or RDP into any VM I build and the laptop will be completely portable.
Conclusion
Building a Windows Hypervisor on your Laptop is super easy and I was able to complete my in a few hours. It went a lot faster once I installed an SSH service on the VyOS router and just pasted my commands through a SSH terminal instead of typing each one by hand.
I really like the VyOS router and will make it a standard for all my virtual labs going forward. It is light weight, fast, and very easy to program and use. Complete winner in my books.
With 16 GB of RAM, I suspect I can get probably 5-6 VM’s running at one time inside the laptop and switch between them pretty easily. I was able to play with Salt within a few hours after I configured just 2 small Ubuntu servers. Not bad for a completely free lab solution.
Give it a try and let me know how it works for you. Please leave a comment below and if you liked reading this, consider signing up for the email list and I can let you know when I post new articles (usually 1-2 a month).